Article Collection
This article is part of the following series:1. Security
Table of Contents
Introduction
Sometimes you want to enforce one-way data flow between computers, and a software-based solution is not enough.
It is possible to configure one-way traffic using software only, for example by using a firewall. But there are various reasons that could make this solution impossible or unreliable:
-
You might not have access to network configuration on the host
-
Firewall rules could be forgotten or defined incorrectly
-
There could be a delay until firewall rules are loaded or reloaded, allowing traffic in both directions
-
An authorized user or malware could force connecting in the opposite direction, for example by disabling the firewall
-
Machines could still communicate 2-way on a level that wasn’t prevented by the firewall or that was below user’s direct awareness (ARP, DHCP, etc.)
So you would want a hardware-level guarantee that data flow is one-way only while still being able to use standard networking protocols.
Typical use cases for hardware-level protection include setting up a transparent network sniffer/monitor or e.g. a secure system for generating PKI keys.
It turns out that it is possible to convert an ethernet (LAN) cable into a physical 100 Mbps, half-duplex, one-way link by changing how the pins are connected on the ends of the cable. Then, it is possible to establish a high-level data flow over it using the UDP protocol.
Ethernet (LAN) Cable Basics
Ethernet cables are typically used to connect two computers directly, or to connect multiple computers to a network switch so that they can communicate as a group.
Most common ethernet speeds are 10Mbps, 100Mbps, 1Gbps, 2.5Gbps, 10Gbps, and 40Gbps. That’s “bits per second”, meaning you should divide by 8 to get approximate speeds in bytes per second. And to estimate a maximum data transfer rate over a link, you can count that roughly 10% will be lost on the overhead of the TCP/IP protocol. (We will not be using TCP, but it is still a good reference.)
Ethernet cables consist of 8 wires, some of which may be unused – it all depends on the standard and speed that’s negotiated on connection. Cables are color-coded for easier identification of wires on both ends.
There is nothing special about ethernet wire colors — as long as you would put 8 wires into connectors on both sides in the same order (1-1, 2-2, etc.) you would have a working cable.
However, there are two nuances to keep in mind:
-
Most network cards today can autodetect whether a cable is connected to another card directly or to a switch. But strictly speaking, when connecting two computers directly, the send and receive pins on one side need to be crossed-over, i.e. connected to receive and send on the other. That type of cable is called a crossover cable.
-
Additionally, even though you can connect wires disregarding the color (as long as they are physically in the correct order), two standards named T568A and T568B define the default color and pin assignments for 8-wire cables.
Hardware Setup
Standard Pinout
Consider the standard Ethernet cable wiring, which can also be seen on the mentioned T568A and T568B page.
Notice that for 10 and 100Mbps links, only 4 out of 8 wires are used:
| Pin/Wire | T568A Pair | T568B Pair | 10BASE-T / 100BASE-TX | 1000BASE-T signal ID | Wire | T568A color | T568B color |
|---|---|---|---|---|---|---|---|
| 1 | 3 | 2 | TX+ | DA+ | tip | white/green | white/orange |
| 2 | 3 | 2 | TX− | DA− | ring | green | orange |
| 3 | 2 | 3 | RX+ | DB+ | tip | white/orange | white/green |
| 4 | 1 | 1 | unused | DC+ | ring | blue | blue |
| 5 | 1 | 1 | unused | DC− | tip | white/blue | white/blue |
| 6 | 2 | 3 | RX− | DB− | ring | orange | green |
| 7 | 4 | 4 | unused | DD+ | tip | white/brown | white/brown |
| 8 | 4 | 4 | unused | DD− | ring | brown | brown |
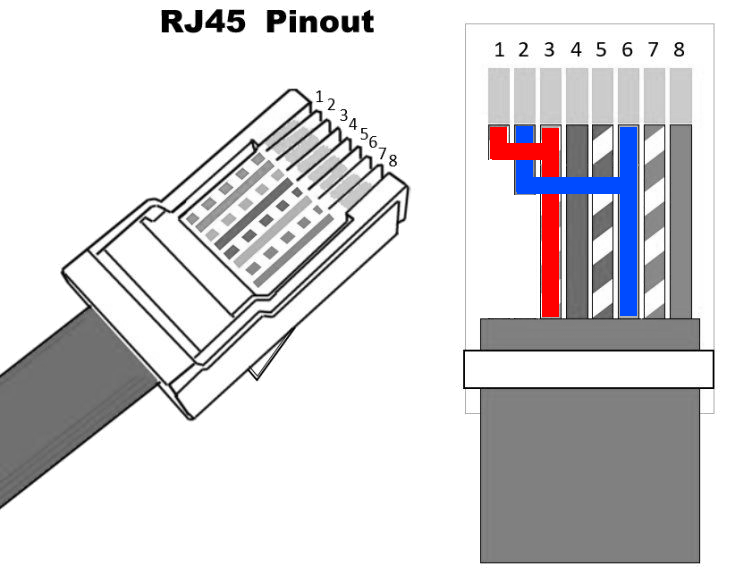
One-way Pinout
For a one-way, 100Mbps link, we need to take a straight (not crossover) network cable and cut and reconnect two pins:
-
On the sending side (the source/hub/switch side):
-
We are not affected by T568 standard and/or color-coding; we are only interested in wire numbers, which are always the same
-
Connect wire 1 to wire 3. For reference, in T568A connect white/orange to white/green, or in T568B connect white/green to white/orange
-
Connect wire 2 to wire 6. For reference, in T568A connect orange to green, or in T568B connect green to orange
-
For best performance, make the connection as close as possible to the connector itself (RJ45 jack)
-
-
On the receiving side (the secure host/destination side):
-
The wires 1 and 2 will simply no longer exist since they have been cut and diverted on the sender side
-
For best performance (minimizing the risk of wire crosstalk and packet loss), just remove the whole wire pair 1 out of the cable
-
Connecting the Cable
The end of the cable with all 8 pins/wires should go to the side that needs to send data. The sending side needs all wires.
The end of the cable with 6 pins should go to the side that receives data. The receiving side needs only the incoming wires.
Software Setup
Data Channel
Since we have a one-way physical link, using TCP/IP is not possible because it requires a handshake and 2-way traffic to establish a connection and acknowledge packets. However, it is possible to use UDP/IP.
The tool we will use to establish the data channel will be some variant of netcat, a venerable Unix utility that was first released in 1995 and has been often described as a networking “Swiss army knife”.
The first variant of netcat we will show is ncat, which itself has often been described as the “Netcat for the 21st century”.
The second variant, socat, is a further extension of the original netcat idea.
You could use either one or even mix their use.
Data Format
Netcat will give us a data channel for sending bytes from one side to the other. That could be satisfactory if the data is an endless stream, but usually we also want to apply some higher-level logic.
So what we will do is show how to use an application for transfer of files.
For that we will, of course, use tar (tape archiver), which will enable us to transfer files in a very robust and configurable way.
We will be able to transfer any files over the link, along with their metadata and with any other features of tar.
Server side
Server side is the receiving one, where files will be transferred to.
Server with Ncat
ncat -lvnuk --recv-only -c 'tar xf -' 8000
The above command will start ncat listening in UDP mode on port 8000, and will, for every new connection, pipe its input into a new process tar xf -.
Starting a new process for every connection may be desirable to auto-recover from errors in data.
Since ncat option -k is used, ncat will keep listening for incoming connections, rather than terminate after the first connection ends.
With ncat option -m, which is not used in the example, it would be possible to limit the maximum number of concurrent connections, to e.g. a value of 1.
With the default options as shown, duplicate filenames will overwrite previous ones. The overwriting can be disabled with tar option -k (keep).
Note that ncat will start the subprocess (tar) with its stdin and stdout connected to the remote end, so it is not possible to use tar option -v to conveniently print the filenames being extracted to the screen.
Server with Socat
socat -u udp-listen:8000,fork STDOUT | tar ivxf -
Note that with the above command, there will only be one tar process started, and all clients will be sending their data into it. Tar will be running in “continuous” mode and there will be no new process started for every connection.
That may be more efficient, but it also makes it harder to recover from errors in tar data. If invalid input is sent, tar appears unable to continue processing later valid data even if it is started with options such as -B or -M.
In this case it is possible to use tar option -v, to see filenames of extracted files printed to the screen.
Client side
Client with Ncat
tar cf - FILES* | ncat -nu --send-only SERVER_IP_ADDRESS 8000
The above command will pack FILES* into a tar archive and print it to stdout, which is then passed using ncat in client mode to the remote side.
Client with Socat
tar cf - FILES* | socat STDIN UDP:SERVER_IP_ADDRESS:8000
Same effect as above, but using socat.
Example
The complete session in which a file with content “This is a test.” is transferred from client to server (over a one-way ethernet link) could look like the following:
On the server:
cd /tmp
mkdir SERVER
cd SERVER
ncat -lvnuk --recv-only -c 'tar xf -' 8000
On the client:
cd /tmp
mkdir CLIENT
cd CLIENT
echo 'This is a test.' > myfile
tar cf - myfile | ncat -nu --send-only 192.168.7.14 8000
After transfer, on the server we can test for presence and content of myfile:
cd /tmp/SERVER
cat myfile

This is a test.
Note that we are using tar and are not limited to sending one file at a time; that was just an example. You can freely specify multiple files, shell globs, etc.
Additional Options
Ncat supports various additional options. They are best summarized in Netcat’s quick help:
$ ncat -h
Ncat 7.70 ( https://nmap.org/ncat )
Usage: ncat [options] [hostname] [port]

Options taking a time assume seconds. Append 'ms' for milliseconds,
's' for seconds, 'm' for minutes, or 'h' for hours (e.g. 500ms).
  -4                         Use IPv4 only
  -6                         Use IPv6 only
  -U, --unixsock             Use Unix domain sockets only
  -C, --crlf                 Use CRLF for EOL sequence
  -c, --sh-exec <command>    Executes the given command via /bin/sh
  -e, --exec <command>       Executes the given command
      --lua-exec <filename>  Executes the given Lua script
  -g hop1[,hop2,...]         Loose source routing hop points (8 max)
  -G <n>                     Loose source routing hop pointer (4, 8, 12, ...)
  -m, --max-conns <n>        Maximum <n> simultaneous connections
  -h, --help                 Display this help screen
  -d, --delay <time>         Wait between read/writes
  -o, --output <filename>    Dump session data to a file
  -x, --hex-dump <filename>  Dump session data as hex to a file
  -i, --idle-timeout <time>  Idle read/write timeout
  -p, --source-port port     Specify source port to use
  -s, --source addr          Specify source address to use (doesn't affect -l)
  -l, --listen               Bind and listen for incoming connections
  -k, --keep-open            Accept multiple connections in listen mode
  -n, --nodns                Do not resolve hostnames via DNS
  -t, --telnet               Answer Telnet negotiations
  -u, --udp                  Use UDP instead of default TCP
      --sctp                 Use SCTP instead of default TCP
  -v, --verbose              Set verbosity level (can be used several times)
  -w, --wait <time>          Connect timeout
  -z                         Zero-I/O mode, report connection status only
      --append-output        Append rather than clobber specified output files
      --send-only            Only send data, ignoring received; quit on EOF
      --recv-only            Only receive data, never send anything
      --allow                Allow only given hosts to connect to Ncat
      --allowfile            A file of hosts allowed to connect to Ncat
      --deny                 Deny given hosts from connecting to Ncat
      --denyfile             A file of hosts denied from connecting to Ncat
      --broker               Enable Ncat's connection brokering mode
      --chat                 Start a simple Ncat chat server
      --proxy <addr[:port]>  Specify address of host to proxy through
      --proxy-type <type>    Specify proxy type ("http" or "socks4" or "socks5")
      --proxy-auth <auth>    Authenticate with HTTP or SOCKS proxy server
      --ssl                  Connect or listen with SSL
      --ssl-cert             Specify SSL certificate file (PEM) for listening
      --ssl-key              Specify SSL private key (PEM) for listening
      --ssl-verify           Verify trust and domain name of certificates
      --ssl-trustfile        PEM file containing trusted SSL certificates
      --ssl-ciphers          Cipherlist containing SSL ciphers to use
      --ssl-alpn             ALPN protocol list to use.
      --version              Display Ncat's version information and exit

See the ncat(1) manpage for full options, descriptions and usage examples
Links
Article Collection
This article is part of the following series:1. Security
Automatic Links
The following links appear in the article:
1.
2. Netcat - https://en.wikipedia.org/wiki/Netcat
3. UDP - https://en.wikipedia.org/wiki/User_Datagram_Protocol
4. Ncat - https://nmap.org/ncat/